If you’ve read the other blog post, you’ll have seen how I built a Pi4 machine before the RISC OS port was ready by using the ACE4U form-factor hub, but it was a bit untidy, so I decided to modify a case for it.
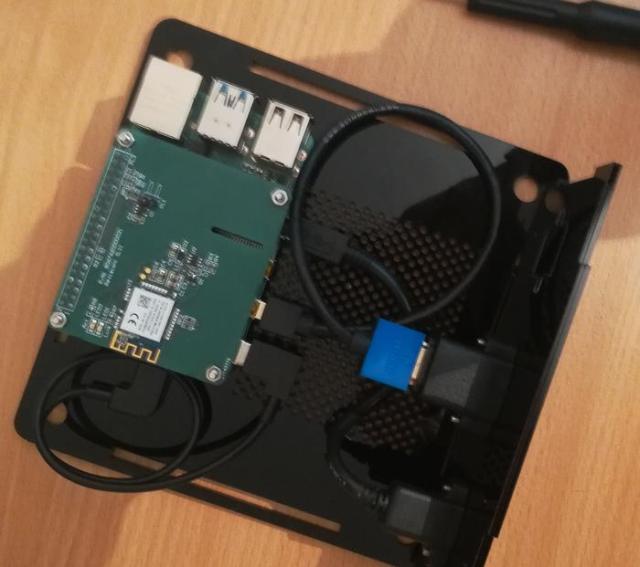
In terms of encasing, one of the thoughts on my journey back from the SouthWest Show was that both my Deuce and Uniq-Ace cases have cutouts for some of the form-factor hubs, including the ACE4U, so mounting the hub in there should be fairly straight forward. Now that the whole system stacked up on itself, the hub at the bottom, this would allow me to utilise the cutout easily whilst keeping everything compact. The only problem with this would mean that the usual ports that are exposed from the Pi are nowhere near the side. However, given that those ports are either different ports, or used in a different way, this was actually an advantage. Cutting a new front panel was a necessity rather than a chore.
All the trailing cables could be contained inside and hidden, and a specially cut front plate to allow panel mount sockets to be used. As this was a simple design reconfiguration, it wouldn’t create too much of an issue.
I opted to convert the micro HDMI port to a panel mounted full HDMI port, as full HDMI cables are easier to find in my cable bin!
One other consideration, that I’ve mentioned previously, was that of heat dissipation. As I was having to get the front plate re-cut, I decided to add ventilation to the side and base panels so that air could flow through the case, over the Pi. The fan shim would help here too. The laser cutting firm I use love pressing bits of acrylic out of little holes for me (the phrase they use is ‘therapeutic but they turn up everywhere for weeks!’) I decided to do them a favour by offering a therapeutic cut of lots of little holes that would need the acrylic pushing out!
I then added some internal cables and the relevant panel mount adaptors (listed below) to tidy everything up on the outside, but it is slightly messy on the inside!

Bolting the Pi/Ace4U/WIFI HAT sandwich in place and connecting the PSU cable. Note the copious amounts of venting holes!
Front panel in place: HDMI to micro HDMI cable; external micro USB to Ace4U micro USB power; Ace4U power and data to Pi USB-C Cable (angled)
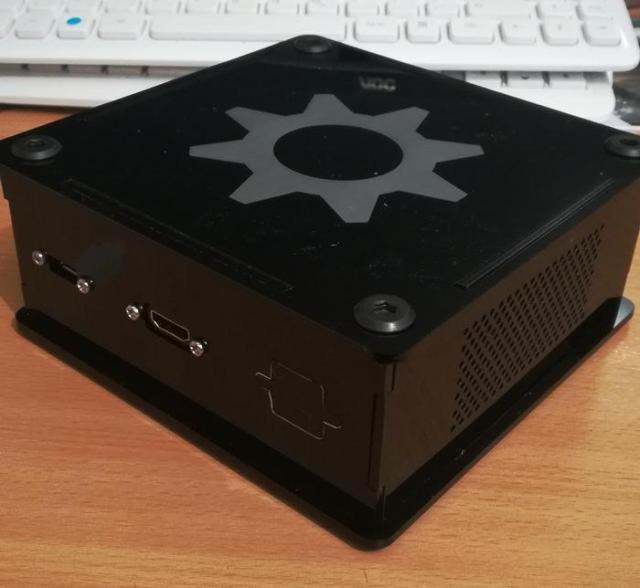
Complete case panel and aerated side – now where did I put those black screws?!
USB panel and aerated side – nice logo!

All set up with nowhere to go!
So, to make your Pi 4 system into a better looking desktop machine, simply add:
- panel mount microUSB extension cable
- micro HDMI to HDMI cable
- HDMI panel mount adaptor
- 3.5mm audio panel mount extension (optional)
and, of course, a custom Deuce case!
It’s worth noting that I purposefully didn’t bring the two internal USB ports out to the external panel of the case. My plan is to add a USB hard drive and possibly a USB to ethernet adaptor (hence the pop-out option on the case).
I did notice a minor increase in temperature, despite all those air holes. And I’m likely to be finding the leftover tiny bits of acrylic all around the workshop for a few weeks, I suspect!
So, there you go – A RISC OS Pi 4 in a case! Until the drivers for the Pi 4 are complete, I suspect that’s not too bad an option.
